0x0. 前言
博客标题实际上是一个知乎上的问题,这篇博客就以这两天定位SGLang Diffusion在推理Qwen-Image-Edit-2511时比LightX2V慢的问题为真实例子来演示一下如何系统的定位并分析PyTorch模型推理中的性能瓶颈。

0x1. H100 单卡 benchmark对齐
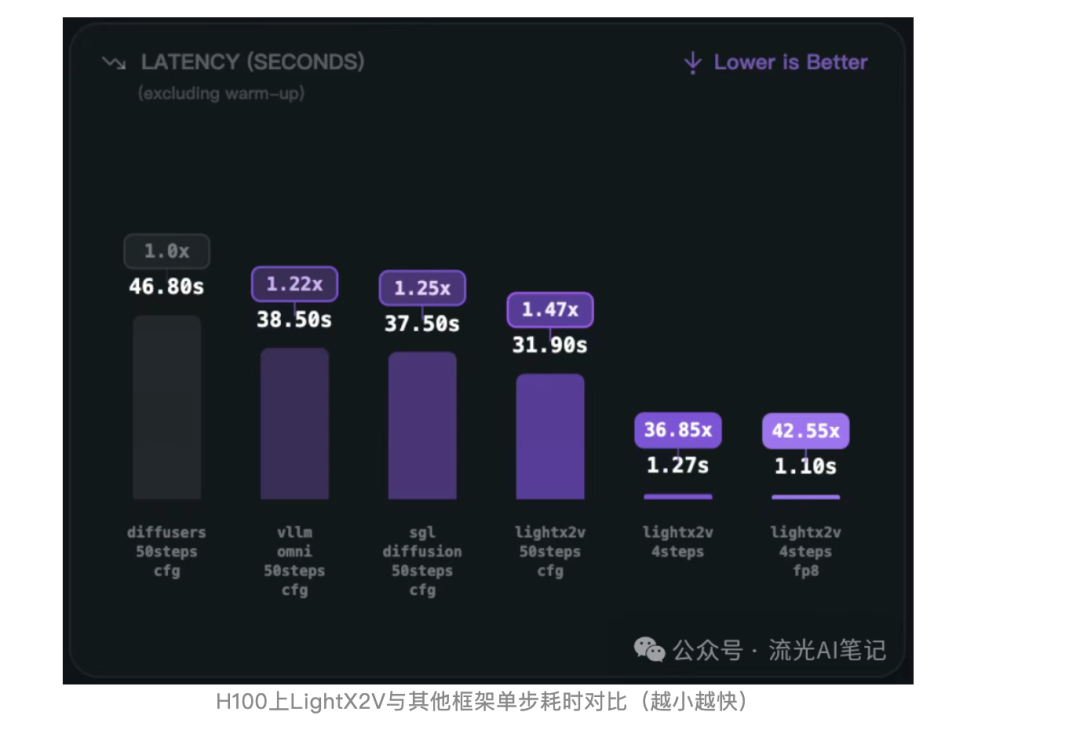
首先需要复现结果,然后再去找问题。通过社区投稿|LightX2V Day-0支持Qwen-Image-Edit-2511模型,加速超42倍!这篇帖子的数据图片可以看到跑完整的40 steps时SGLang generate比LightX2V要慢:
然后,我就加了一下LightX2V的群,去问如何复现这个性能,消除了很多噪声之后问到了复现这个性能的脚本以及prompt和需要编辑的图片。接着就装了一下LightX2V来跑,配置好环境后使用下面的脚本去跑,跑的环境是H100单卡:
#!/bin/bash

# set path and first
export lightx2v_path=/home/lmsys/bbuf/LightX2V
export model_path=Qwen/Qwen-Image-Edit-2511

export CUDA_VISIBLE_DEVICES=0

# set environment variables
source ${lightx2v_path}/scripts/base/base.sh

python -m lightx2v.infer \
    --model_cls qwen_image \
    --task i2i \
    --model_path $model_path \
    --config_json ${lightx2v_path}/configs/qwen_image/qwen_image_i2i_2511.json \
    --prompt "Change the person to a standing position, bending over to hold the dog's front paws." \
    --negative_prompt " " \
    --image_path "/home/lmsys/bbuf/LightX2V/examples/qwen_image/1.png" \
    --save_result_path ${lightx2v_path}/save_results/qwen_image_i2i_2511.png \
    --seed 0
#!/bin/bash
# set path and first
export lightx2v_path=/home/lmsys/bbuf/LightX2V
export model_path=Qwen/Qwen-Image-Edit-2511
export CUDA_VISIBLE_DEVICES=0
# set environment variables
source ${lightx2v_path}/scripts/base/base.sh
python -m lightx2v.infer \
--model_cls qwen_image \
--task i2i \
--model_path $model_path \
--config_json ${lightx2v_path}/configs/qwen_image/qwen_image_i2i_2511.json \
--prompt "Change the person to a standing position, bending over to hold the dog's front paws." \
--negative_prompt " " \
--image_path "/home/lmsys/bbuf/LightX2V/examples/qwen_image/1.png" \
--save_result_path ${lightx2v_path}/save_results/qwen_image_i2i_2511.png \
--seed 0运行结果如官方所说,warmup之后一个DIT的step大概是0.63s左右。
然后SGLang里面使用相同的数据,同样的prompt,同样的图片,同样的环境,同样的H100单卡:
然后 https://github.com/sgl-project/sglang/blob/main/python/sglang/multimodal_gen/configs/models/dits/qwenimage.py#L23 这里的zero_cond_t改成True才能和上面对齐。
sglang generate --model-path Qwen/Qwen-Image-Edit-2511 --prompt "Change the person to a standing position, bending over to hold the dog's front paws." --image-path "/home/lmsys/bbuf/LightX2V/examples/qwen_image/1.png"sglang generate --model-path Qwen/Qwen-Image-Edit-2511 --prompt "Change the person to a standing position, bending over to hold the dog's front paws." --image-path "/home/lmsys/bbuf/LightX2V/examples/qwen_image/1.png"下面是运行结果:
100%|███████████████████████████████████████████████████████████████████████████████████████████████████████████████████████████| 40/40 [00:30<00:00,  1.29it/s]
[12-25 07:11:20] [DenoisingStage] average time per step: 0.7722 seconds
[12-25 07:11:20] [DenoisingStage] finished in 30.8956 seconds
[12-25 07:11:20] [DecodingStage] started...
[12-25 07:11:20] [DecodingStage] finished in 0.5390 seconds
[12-25 07:11:20] Output saved to outputs/Change_the_person_to_a_standing_position_bending_over_to_hold_the_dog_s_front_paws._20251225-071047_08c591d4.jpg
[12-25 07:11:20] Pixel data generated successfully in 33.13 seconds
100%|███████████████████████████████████████████████████████████████████████████████████████████████████████████████████████████| 40/40 [00:30<00:00, 1.29it/s]
[12-25 07:11:20] [DenoisingStage] average time per step: 0.7722 seconds
[12-25 07:11:20] [DenoisingStage] finished in 30.8956 seconds
[12-25 07:11:20] [DecodingStage] started...
[12-25 07:11:20] [DecodingStage] finished in 0.5390 seconds
[12-25 07:11:20] Output saved to outputs/Change_the_person_to_a_standing_position_bending_over_to_hold_the_dog_s_front_paws._20251225-071047_08c591d4.jpg
[12-25 07:11:20] Pixel data generated successfully in 33.13 seconds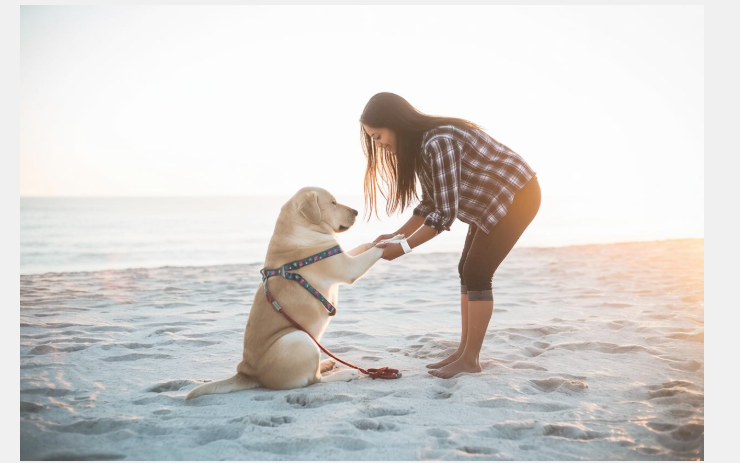
可以看到平均一个step是0.77s,比LightX2V慢了0.14s,
性能问题已经明确,接下来就是去分析性能瓶颈了。
0x2. 最终结果
先说结果,通过后续2节的分析和优化之后,通过 https://github.com/sgl-project/sglang/pull/15812 这个PR将SGLang generate生成一个step的耗时也从0.77s降低到0.63s的水平,几乎持平LightX2V。
在PR之后,还是一样的测试命令和结果
sglang generate --model-path Qwen/Qwen-Image-Edit-2511 --prompt "Change the person to a standing position, bending over to hold the dog's front paws." --image-path "/home/lmsys/bbuf/LightX2V/examples/qwen_image/1.png"sglang generate --model-path Qwen/Qwen-Image-Edit-2511 --prompt "Change the person to a standing position, bending over to hold the dog's front paws." --image-path "/home/lmsys/bbuf/LightX2V/examples/qwen_image/1.png"[12-25 07:00:34] [DenoisingStage] started...
100%|███████████████████████████████████████████████████████████████████████████████████████████████████████████████████████████| 40/40 [00:25<00:00, 1.58it/s]
[12-25 07:00:59] [DenoisingStage] average time per step: 0.6327 seconds
[12-25 07:00:59] [DenoisingStage] finished in 25.3114 seconds
[12-25 07:00:59] [DecodingStage] started...
[12-25 07:01:00] [DecodingStage] finished in 0.5667 seconds[12-25 07:00:34] [DenoisingStage] started...
100%|███████████████████████████████████████████████████████████████████████████████████████████████████████████████████████████| 40/40 [00:25<00:00, 1.58it/s]
[12-25 07:00:59] [DenoisingStage] average time per step: 0.6327 seconds
[12-25 07:00:59] [DenoisingStage] finished in 25.3114 seconds
[12-25 07:00:59] [DecodingStage] started...
[12-25 07:01:00] [DecodingStage] finished in 0.5667 seconds
下面2节就来讲一下怎么系统性的定位和分析这个性能瓶颈。
0x3. 模型实现层面的分析
第一个分析点是模型实现层面的分析,我们可以借助AI例如Cursor来初步发现两个模型实现层面的差异。我这边发现的主要区别就是LightX2V多了一个Triton算子 fuse_scale_shift_gate_select01_kernel 用来把 https://github.com/sgl-project/sglang/pull/15812/files#diff-a1d4f7adbfc068b3af9b02dbca9fda29b80c734364bc03d6e251600dafbdf6b4R503-R529 这个函数里面的3个where和1个elementwise算子变成了1个,我也直接apply了一下确实提升了,1个step的速度从0.77到0.73s左右。后续从Nsight System的分析中也可以看到这个区别:
fuse_scale_shift_gate_select01_kernel: 148us->66us。
main:

pr:

可以看到这个triton fuse kernel的优化是有效的。
需要说明的是这里使用 nsys profile —trace-fork-before-exec=true —cuda-graph-trace=node —force-overwrite=true -o qwen_image_edit sglang generate —model-path Qwen/Qwen-Image-Edit-2511 —prompt “Change the person to a standing position, bending over to hold the dog’s front paws.” —image-path “/home/lmsys/bbuf/LightX2V/examples/qwen_image/1.png” 这个命令来获取Nsight Systems的profile结果,然后在windows/mac上用Nsight Systems winddowns/mac端软件打开就可以分析了。然后做性能分析的时候直接把一个step的一个layer挑出来对比就可以了。
0x4. 结合Nsight Systems 对kernel进行分析
这个时候AI就帮不了我们了,它很难正确的阅读Nsight Systems的profile结果,所以得自己去根据经验来分析。
解决了上面那个问题之后差距仍然还在的,那么接下来就是固定死一个step的一个layer之后来分析了。同样的方法把LightX2V的profile结果也生成出来:
#!/bin/bash

# set path and first
export lightx2v_path=/home/lmsys/bbuf/LightX2V
export model_path=Qwen/Qwen-Image-Edit-2511

export CUDA_VISIBLE_DEVICES=0

# set environment variables
source ${lightx2v_path}/scripts/base/base.sh

nsys profile --trace-fork-before-exec=true --cuda-graph-trace=node  --force-overwrite=true -o lightx2v_qwen_image_edit python -m lightx2v.infer \
    --model_cls qwen_image \
    --task i2i \
    --model_path $model_path \
    --config_json ${lightx2v_path}/configs/qwen_image/qwen_image_i2i_2511.json \
    --prompt "Change the person to a standing position, bending over to hold the dog's front paws." \
    --negative_prompt " " \
    --image_path "/home/lmsys/bbuf/LightX2V/examples/qwen_image/1.png" \
    --save_result_path ${lightx2v_path}/save_results/qwen_image_i2i_2511.png \
    --seed 0
#!/bin/bash
# set path and first
export lightx2v_path=/home/lmsys/bbuf/LightX2V
export model_path=Qwen/Qwen-Image-Edit-2511
export CUDA_VISIBLE_DEVICES=0
# set environment variables
source ${lightx2v_path}/scripts/base/base.sh
nsys profile --trace-fork-before-exec=true --cuda-graph-trace=node --force-overwrite=true -o lightx2v_qwen_image_edit python -m lightx2v.infer \
--model_cls qwen_image \
--task i2i \
--model_path $model_path \
--config_json ${lightx2v_path}/configs/qwen_image/qwen_image_i2i_2511.json \
--prompt "Change the person to a standing position, bending over to hold the dog's front paws." \
--negative_prompt " " \
--image_path "/home/lmsys/bbuf/LightX2V/examples/qwen_image/1.png" \
--save_result_path ${lightx2v_path}/save_results/qwen_image_i2i_2511.png \
--seed 0接着就是对比了,flash attention的kernel比较明显,我们可以直接把2个flash attention的kernel作为TimeLine左右端点,然后对比中间的每个kernel。对比之后就发现了3个问题:
use upstream fa3 , not sgl-kernel fa3 : 1.7ms->1.2ms
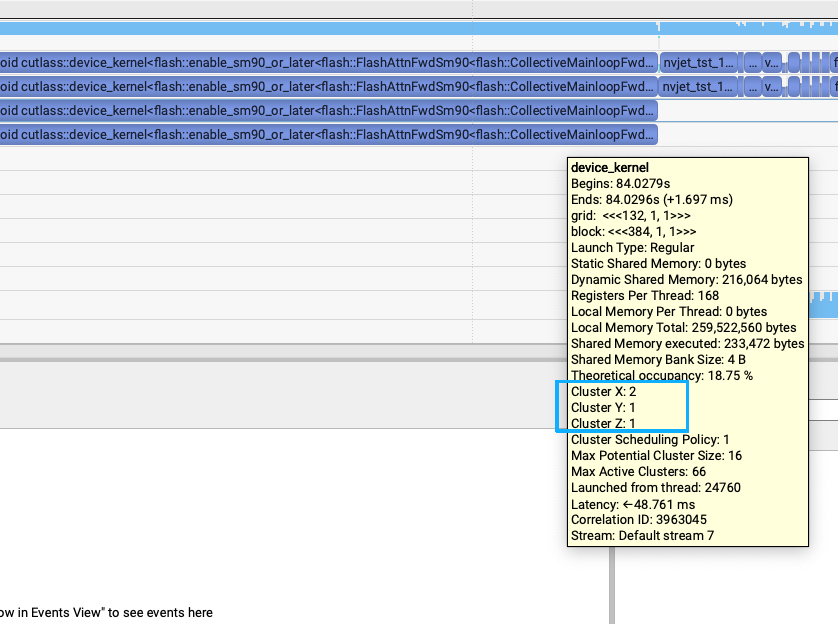
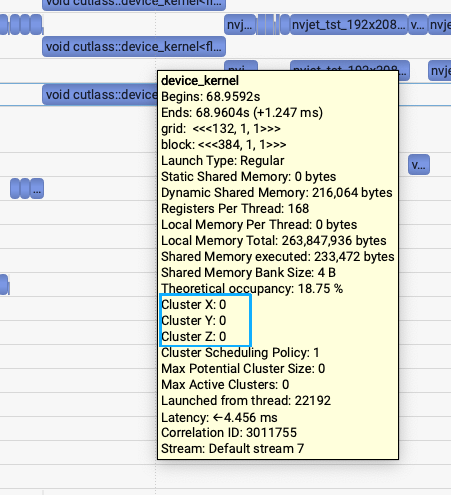
第一个问题是发现SGLang generate和LightX2V generate的flash attention V3的kernel耗时有比较大差距,1.7ms vs (1.1-1.2ms)的差距。关键的区别就是SGLang Diffusion使用的是sgl-kernel的fa3接口,但LightX2V使用的是官方flash-attention库的fa3接口。上面2张图里面也能发现细微的区别,所以通过把SGLang Diffusion的fa3接口改成upstream的fa3接口之后,耗时从1.7ms降到1.2ms左右。
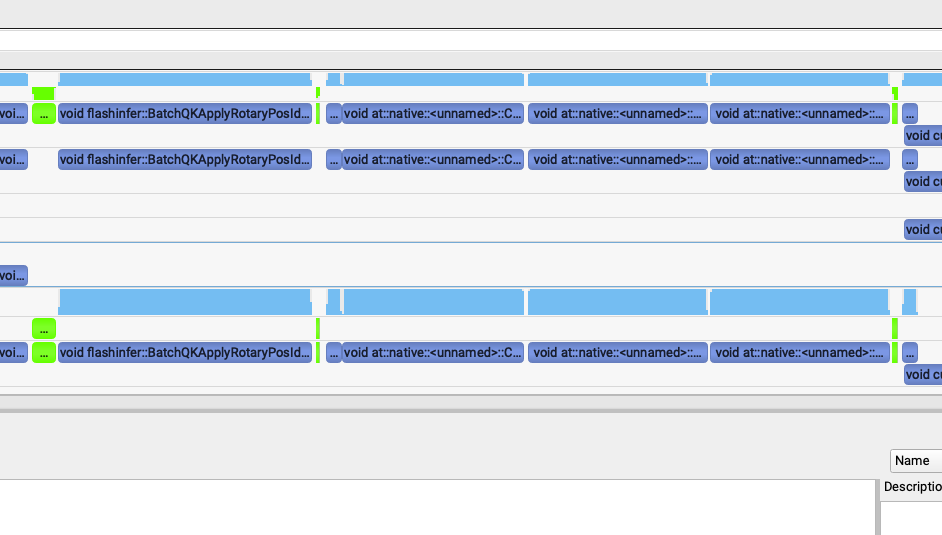
flashinfer rope: 241us->82us
第二个发现就是LightX2V用的是FlashInfer库的rope实现,而SGLang Diffusion用的是Triton实现的rope。
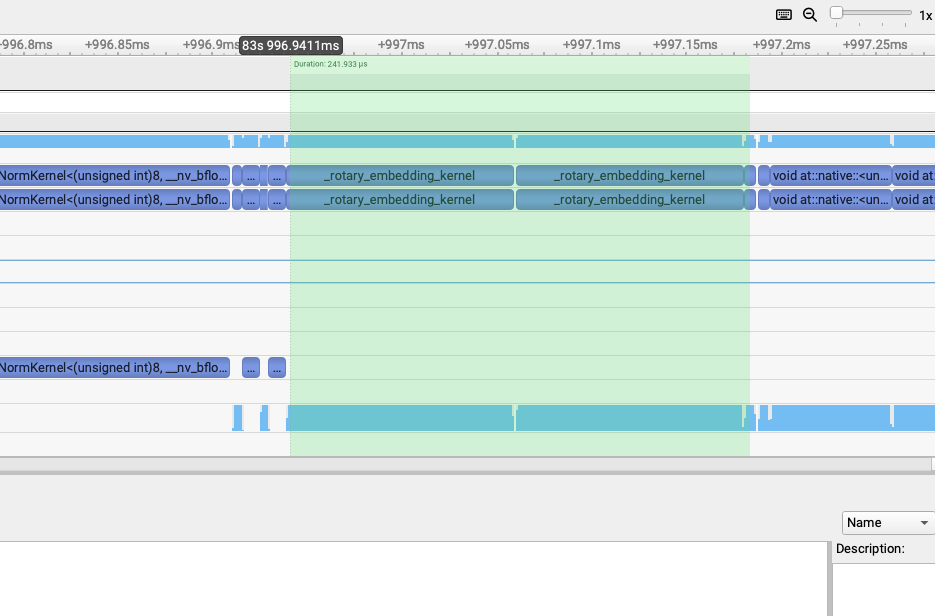
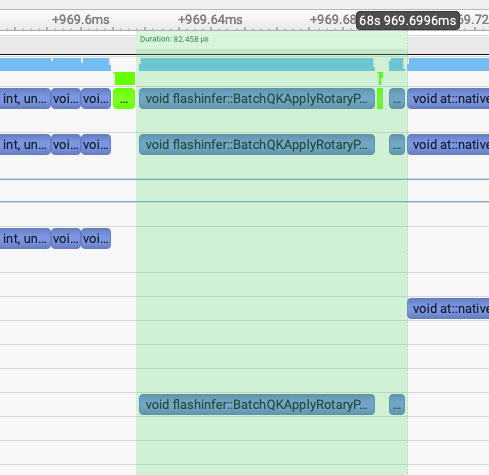
通过把SGLang Diffusion的rope实现改成FlashInfer的rope实现之后,2个rope部分的kernel总耗时从241us降到82us左右。
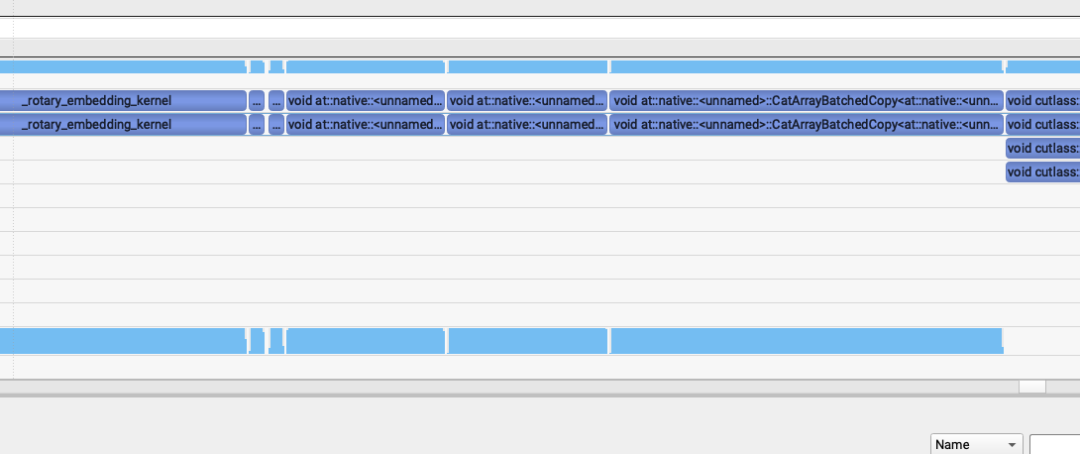
revert pack qkv to avoid unaligned cat kernel: 154.5us->70us
这个问题就比较有趣了,我发现rope之后,attention之前有这三行代码:
https://github.com/sgl-project/sglang/blob/a8785f5a87ae4ba5315d33da7aba1db33d45ed95/python/sglang/multimodal_gen/runtime/models/dits/qwen_image.py#L406
    # Concatenate for joint attention
    # Order: [text, image]
    joint_query = torch.cat([txt_query, img_query], dim=1)
    joint_key = torch.cat([txt_key, img_key], dim=1)
    joint_value = torch.cat([txt_value, img_value], dim=1)

    # Compute joint attention
    joint_hidden_states = self.attn(
        joint_query,
        joint_key,
        joint_value,
    )
# Concatenate for joint attention
# Order: [text, image]
joint_query = torch.cat([txt_query, img_query], dim=1)
joint_key = torch.cat([txt_key, img_key], dim=1)
joint_value = torch.cat([txt_value, img_value], dim=1)
# Compute joint attention
joint_hidden_states = self.attn(
joint_query,
joint_key,
joint_value,
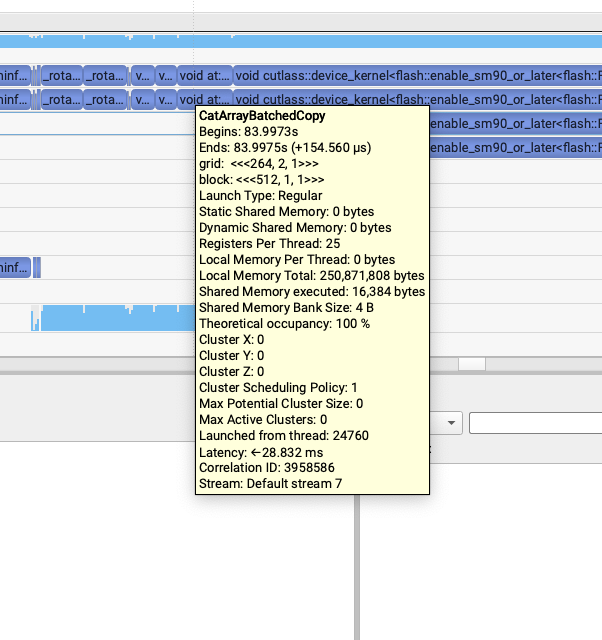
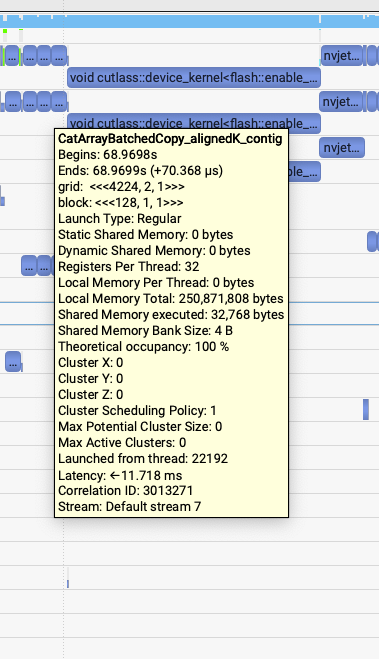
)然后LightX2V里面这三个concat如下图所示,都是50us左右,并且调用的都是同一个contiguous kernel模板

但是SGLang generate中出现了奇怪的问题,我发现第三个kernel很慢,比前面2个加起来还慢。第一个和第二个kernel是62us,第三个是155us。
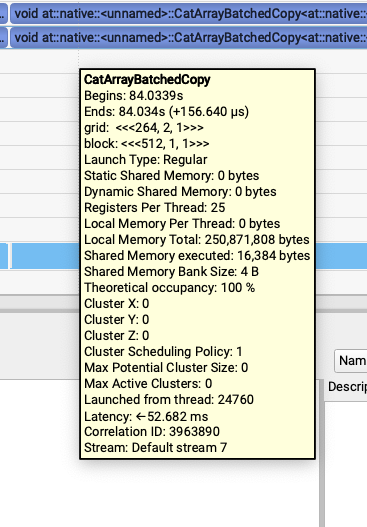
然后就注意到这个模板里面没有align的标识,就去joint_query = torch.cat([txt_query, img_query], dim=1)打印了一下,发现只有txt_value和img_value不是contiguous的。继续倒查到了是因为这个模型之前做的pack qkv在最后一步使用torch.chunk拆分Tensor的时候出来的是不contiguous的Tensor,并且这两个Tensor后续又没有其它不支持非contiguous的kernel调用所以就保持了这个属性,导致了最后的性能问题。
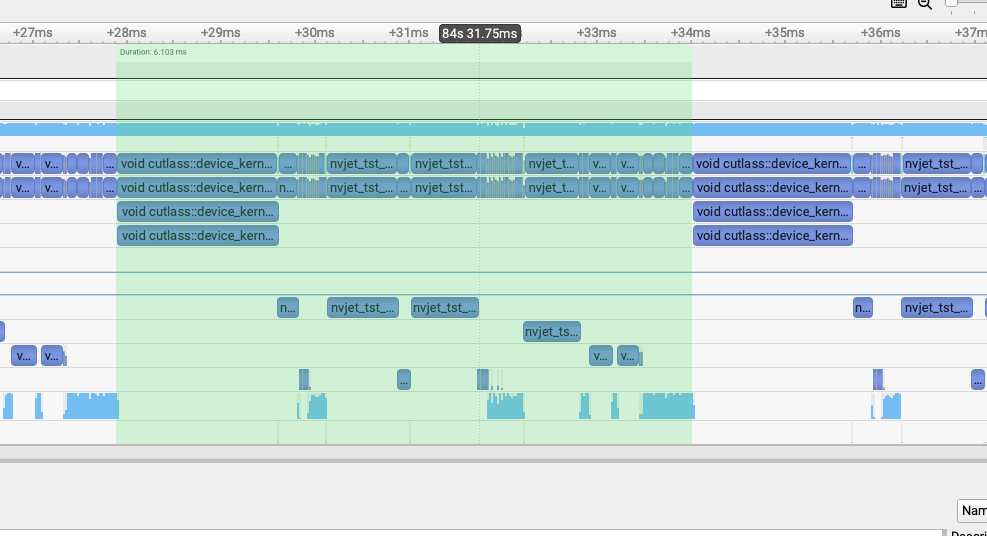
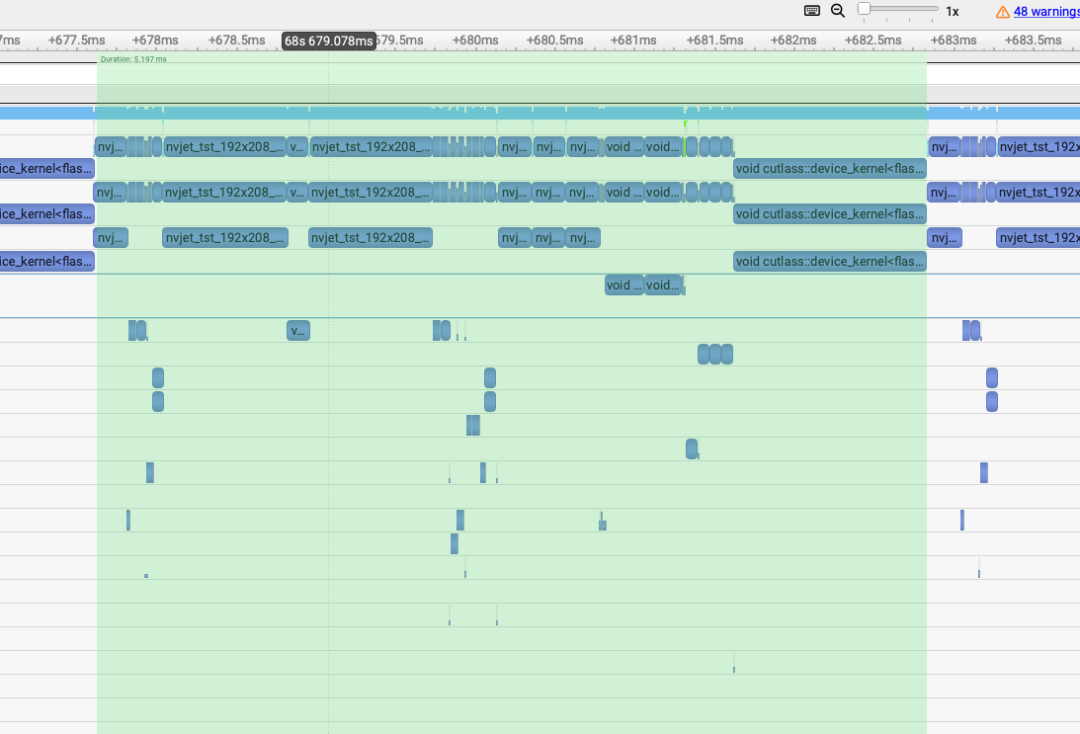
0x5. 一个step的一个layer结果对比
修掉上面分析出的问题之后,对比一个step的一个layer的profile结果:
LightX2V(5.1ms)
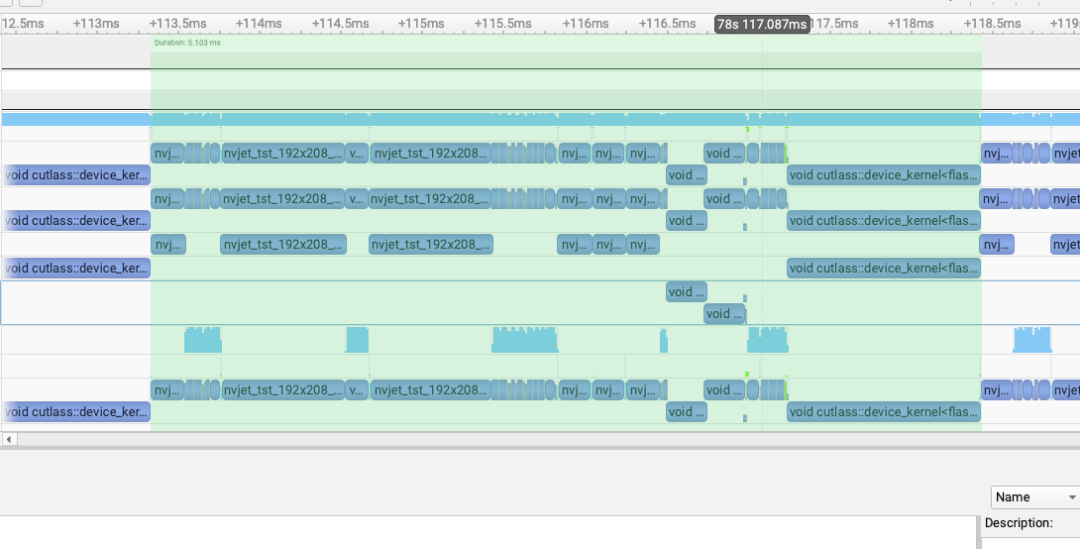
sglang main(6.1ms)
pr(5.19ms)
已经比较接近了,所以初步完成了这个性能分析和优化。
0x6. 总结
因此,当你发现同一个模型在两套框架里推理速度差不少时,先把复现条件完全对齐(同一张图、同一段 prompt、同一张卡、同一套参数),确认“确实慢在哪里”。然后用最直接的办法——Nsight Systems或者Torch Profiler之类的抓一次 profile,固定对比到“同一个 step、同一个 layer”,把两边的 kernel 按时间线一一对照,看看差距到底花在谁身上,然后再继续做下去。